30 January 2011

one for the pups: cream cheese dog biscuits


     I've pretty much owned my kitchen this weekend. It's so funny,  I can't seem to find the balance of fun activities like I should. You know, friend time + cooking + crafting. But noooooo. I have just been blasting through all the clean dishes at a most impressive rate. At least I got some sweet photos so I can post some stuff here...

So I decided to bake some treats for my dog. I've been really excited about using my new cookie cutters, so this opportunity was too much fun to pass up. Here, check out our silly gingerfolks:


We're trying to get away from buying treats so much. When Tess was a puppy, we went through treats like it was going out of style -- such is life with a growing pup going through obedience class. So now we want to cool it with having so many kinds in the house. And really, I'm sure making them ourselves is going to be the cheapest option. Her enthusiasm for devouring homemade treats is encouraging as well.

Here's my dog showing off for a cookie. Her default move in hopes of getting the cookie faster is the 'solid sit':
Oh, the anticipation!!!
Easy Cream Cheese Dog Biscuits

Ingredients:
2 1/4 t. dry yeast (one package)
1/4 c. warm water (100-110 F)
2 1/3 c. whole wheat flour, plus more for rolling
1/4 c. unsweetened applesauce
4 oz. cream cheese (leave it out to soften beforehand)
1 egg
1/4 c. powdered milk, plus extra for rolling
1 t. garlic powder 

Directions:
1. Preheat oven to 350 F.
2. Dissolve the yeast in a large bowl. Combine with all ingredients and mix into the dough (I used a hand mixer, adding the flour 1/2 c. at a time). 
3. Roll out onto a floured surface to 1/4 inch thickness. 
4. Sprinkle dough with extra dry milk to make it easier to roll out.
5. Cut into shapes with your favorite cookie cutters.
6. Place biscuits on a cookie sheet covered with parchment paper (note: I am getting silicone mats for the next round of these -- it's handy that dogs won't judge you if the bottoms of their cookies are a little too dark!! So be sure to check on them.).
7. Bake for 20-25 minutes or until a light, golden brown.
8. Store in an airtight container in the refrigerator.

17 January 2011

lemon & lavender sugar cookies


I have most definitely been meaning to post this ringer since, uhmm, before the holidays (derp!). It suits my all-encompassing obsession with all things lavender these days. It is getting pretty silly, honestly. It matches my lavender-mint tea tree shampoo and conditioner, hippy-dippy lavender shea body wash, fancy lavender tea, and my most recent -- and probably most ridiculous find: lavender lattes right up the street at the cupcake bakery and cafe! Selling point: the syrup is purple, and really, who doesn't want to try a latte that's purple?! Oh yeah, and I'm pretty danged sure my new lotion that my super-thoughtful sister-in-law got for me is lavender-chamomile-vanilla-rose-delightfulness. She and I probably agree about 75-90% of the time, so it doesn't surprise me that she picked out something that I'm so in love with. In fact, given her recommendation, I've become a pretty big fan of Lush products in general (even on facebook; then I must really mean it). It makes me feel quality.

Right, so yes, COOKIES. Here's the scoop: The recipe comes from the Nov/Dec 2010 edition of Cook's Illustrated for 'Chewy Sugar Cookies', and the lemon and lavender idea comes from their Holiday 2009 special edition, under 'Glazed Butter Cookies'. The butter cookies kind of freaked me out (so. much. butter!), and the sugar cookies looked really pretty with a perfect crackle texture on top, so I went with it.

Ingredients:
2 1/4 c. unbleached all-purpose flour
1/2 t. baking soda
1 t. baking powder
1/2 t. salt
1/2 c. sugar, plus 1/3 c. for rolling
2 oz. cream cheese, cut into 8 pieces
6 T. unsalted butter, melted and still warm
1/3 c. veggie oil
1 large egg
1 T. milk
1 t. vanilla extract
1 t. lemon juice
2 t. grated lemon zest
1 t. ground dried lavender (cheap-cheap in bulk spice as dried flowers -- makes your pantry smell awesome! Mash 'em up with a mortar and pestle, or the MacGuyver way, with the butt end of the ice cream scoop in a small bowl. Nobody judges a person who puts flowers in their cookies!)

Directions:
1. Adjust oven rack to middle position and heat oven to 350 F. Line two large rimmed cookie sheets with parchment paper. Whisk flour, baking soda, baking powder, and slat together in a medium bowl. Set aside.

2. Place 1 1/2 c. sugar, cream cheese, anad lavender in a lage bowl. Place remaining 1/3 c. sugar along with the lemon zest in a shallow baking dish or pie plate and set aside. Pour warm butter over sugar and cream cheese and whisk to combine (some small lumps of cream cheese will remain but will smooth out later). Whisk in the oil until incorporated. Add egg, milk, lemon juice, and vanilla, continue to whisk until smooth. Add flour mixture and mix with rubber spatula until soft homogeneous dough forms.

3. Take 2 T. of dough at a time. Using hands, roll dough into a ball. Roll the ball in the zest/sugar mix to coat and evenly space onto prepared baking sheet. There will be 12 balls per sheet (no joke!).

4. Here comes the fun part! Using the bottom of a drinking glass (a juice glass is perfect for this), flatten the dough balls until they are two inches in diameter. Fix any massive cracks in the dough, then sprinkle with any leftover zest/sugar mix.

5. Bake until edges are set and just beginning to brown, 11 to 13 minutes, rotating the trays halfway (switch racks plus a 180 degree turn). Cool cookies on baking sheets 5 minutes. Using wide metal spatula, transfer cookies to wire rack and cool to room temperature.

13 January 2011

No-Knead Bread


I think everyone has their list of foods they'd like to try to make themselves, but are intimidated by them. I'm sure most of my list is fairly common: pie (namely the crust), bread, fancy bakery cakes, pasta, and cheese. I'm over the pie-making fear, and the break-making one too. Does making homemade gnocchi count as making one's own pasta? :)

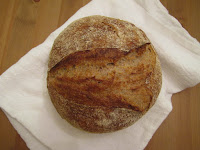
I am here to tell you that you should make your own delicious bread, because it really is easy, cheap, and doesn't take a lot of effort, or really even a lot of equipment. My house standby is the No-Knead Bread recipe from the New York Times. We used to make it all the time, then summer came (= NO BAKING ALLOWED!), then we got all caught up in the fall, and now just realized how much we missed it. I was starting to get so good at buying bakery loaves and looking the other way instead of wincing at the price of it. But no more! New Year's resolution is a go. Those photos up above are introducing you to our first loaf of 2011 (isn't she pretty?).  We hope to progress to more complex recipes, but for now we're going to keep this the routine for a while. 

The routine, as it turns out, is key. So I'm going to lay it down for you, timing and all, in hopes that it helps you check bread off of your list (if you haven't already done so).

1. Throw the ingredients together into a large bowl right before bed, say 10 or 11 PM. Flour, salt, yeast, water -- that's it! No priming the yeast either -- just toss it in and stir. (note: this loaf was 1/2 unbleached white, 1/2 whole wheat flour)

2. The end of the standard workday is handy for the next step as far as timing goes. At ~5:30, I take the bread out of the bowl and fold it over itself on a floured surface with plastic wrap over it (reuse saran from step #1).

3. The next step as far as handling the dough is in 15 minutes, so you can prep for it (efficiency!) in the meantime. Get a cotton towel (not loopy terry; a flat woven one is what you want) and coat it with some cornmeal (or flour, or wheat germ, we just prefer the cornmeal crunch). Go hunt down a container for baking the bread -- we use a big Fiestaware cassarole pot thingy. The key features are that it is a) oven safe, and b) has a lid. 

4. Once the 15 minutes are up (~5:45), flour your hands and then shape the dough in a ball and place it on the towel, seam side down. Sprinkle a bit more cornmeal on it, and then fold the towel over it (or use two towels if need be). The dough now goes through a second rise for two hours. I put it in the microwave to avoid kitty-sized paw prints in the dough (it is cute, and I'm sure it has got to be fun to squish it between your toes, but I don't appreciate it very much). 

5. At ~7:15, put the ovenproof pot in the oven and preheat to 450 F.

6. At 7:45, carefully take the pot out of the oven and flip the dough into it. Put the lid back on, and bake for 30 minutes.

7. At 8:15, take the lid off.

8. At 8:45, turn off the oven and take the beautiful golden loaf out! Hooray for bread!

9. Once it is cool enough to touch, take the loaf out of the pot and cool it on a wire rack completely before storing it.

08 January 2011

broccoli & cheese soup

Okay, so I may not have posted in a month (gulp!), but a lot has been going on behind the scenes to make 2011 an excellent year for food blogging!
  1. Husband, being the tech-efficiency whiz/sweet guy that he is, got me a blog-conscious holiday gift! Meet the Eye-Fi: I now have a memory card for the camera that is linked to our wireless network, so whenever I snap a photo,  I get an email letting me know it has been uploaded to my computer! AMAZING! One thing that always bogged me down was waiting for the effin' camera to sync with my computer. Now all I have to do is type up the recipes. :P
  2. New iPhoto on my computer = better organization = better blogging.
  3. Although I swore I wasn't allowed to get any more new cookbooks, I got four for Christmas, so there's more new things to discover and make! (sneak preview: I now own a dog biscuit cookbook! And these hilarious cookie cutters!)
  4. The house New Year's resolution is one homemade loaf of bread per week. I may tweak this to be "anything that involves yeast and flour", as I realize that pizza dough and cinnamon rolls should *totally* count. We are partial to the NYTimes No-Knead Bread, but once we get that one down I'm sure we'll get more adventurous. In fact I just took loaf #1 of 2011 out of the oven. Maybe I'll just have to go snap a photo...
  5. I am now all kinds of outfitted to make my own cakes from scratch. Now if I can just get over being so very intimidated by making them (and frostings! with a hand mixer! eek!). Any encouragement would be appreciated. :)
So yeah, today's recipe comes from my fave standby, A Beautiful Bowl of Soup. Last night I started out feeling pretty uninspired, feeling like mac & cheese was going to be the solution. Then I decided to guilt myself by looking through our produce in the fridge and I was stuck on the broccoli (most likely because we tossed a soupy head of it before we left town for the holidays -- gross). I consulted a few other sources and the recipes seemed either too simple or too full of heavy cream. I made a few adjustments to this one for what I had in my pantry, and ta-da! Delicious soup!

Broccoli & Cheese Soup
ingredients:
3 T. unsalted butter
1 carrot, chopped
1/2 c. onion, chopped
1 stalk of celery, plus a sprig of leaves, chopped
2 cloves of garlic, minced
2 T. all-purpose flour
2 c. veggie stock
1 1/2 c. small broccoli florets
4 tangerine-sized red potatoes, cubed
2 c. milk
2 c. shredded white cheddar cheese
1/4 t. dry mustard
1/4 t. parsley
S&P

directions:
  1. Melt the butter in a dutch oven over medium heat. 
  2. Add the carrot, onion, celery, and garlic; cook, stirring occasionally, until the veggies are tender, about 10 minutes.
  3. Add the flour; stir constantly over low heat for about 2 minutes.
  4. Gradually add the veggie stock, stirring until mixture is smooth each time.
  5. Meanwhile, in a separate pot, steam the broccoli.
  6. Add the potato, mustard, and parsley to the veggie mixture. Increase the heat to high and bring to a boil.
  7. Reduce the heat; cover and simmer, stirring occasionally, until the veggies are tender, about 10 minutes.
  8. Stir in the milk, and off the heat.
  9. Using an immersion blender, puree the veggies and milk.
  10. While the soup is warm, gradually adding the cheese and stirring until melted. 
  11. Add in the broccoli, season with S&P if needed, and warm if needed.
  12. Serve and enjoy!